
You Can Grow Your Own Microgreens (It’s Seriously Easy – Here’s How)
Nutrition on the go is a top priority for many of us. How can you achieve it? Microgreens nutrition deserves to be at the top of that how-to list.
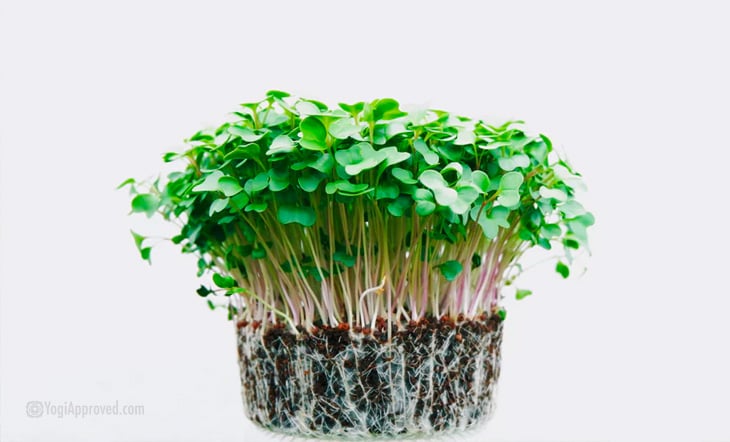
Microgreens are young plant seedlings of edible vegetables and herbs (from beets to basil and carrots to cabbage) and they pack mega nutrients in a tiny package.
Consequently, they’re great for you.
Even better news: microgreens couldn’t be easier to grow. Read on for more information on microgreens nutrition along with how to grown your own microgreens at home.
Microgreens: Exactly How Nutritious Are They?
Studies show that microgreens can have as much as 40 times the nutrients of their mature counterparts.
Both microgreens and sprouts contain dense amounts of Vitamins K, C, and E as well as lutein and beta carotene.
More good news: a number of sprouts, like broccoli, can be grown by the same method explained here.
So what’s the difference between microgreens and sprouts?
Microgreens are grown in soil and take 1-2 weeks to mature. You eat their leaves and stems.
Generally sprouts are germinated in water and are ready to eat in only 4-6 days. You can eat the seedling and the seed.
Whether you choose to grow microgreens or sprouts (or both!), if you grow your own you can nourish your body while beautifying your home, saving money, and ensuring they’re pesticide-free and organically grown.
That’s a winning combination.
Here’s How to Grow Your Own Microgreens and Sprouts
With just a few items and a tiny bit of patience and nurturing, you can put that winning combination to good use in your life.
What you need to grow your own microgreens and sprouts:
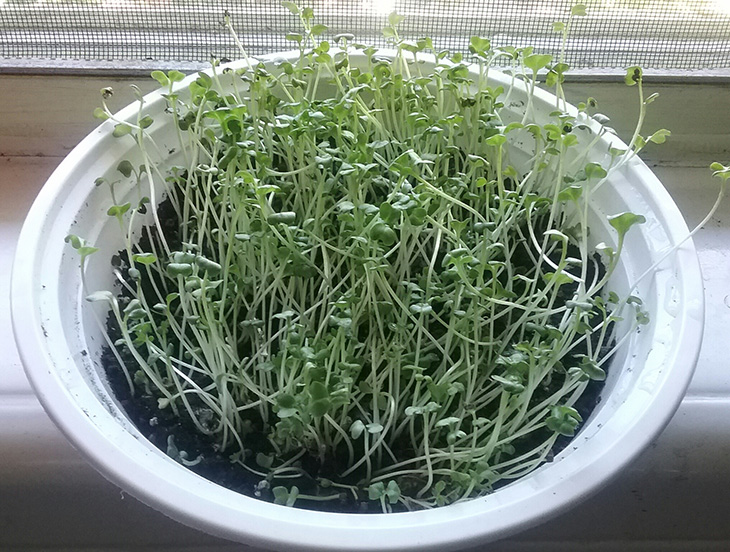
- 1 shallow tray or container with a clear cover or that can be slipped into a plastic bag with room for the seedlings to grow (use a propagation tray or flatten a takeout container)
organic soil - Seeds of your choice (non-GMO seeds are highly recommended). Red cabbage, broccoli sprouts, watercress, spinach, lettuce and herbs are all good options
- Water
- Window sill
That’s it!
What you need to do:
Fill the bottom of the container with about one inch of organic soil. Take a handful of seeds and scatter them evenly across the soil (the more you use the denser they’ll grow).
Scatter them all the way to the edges. Wet, don’t soak, the soil evenly. Using a spray bottle is recommended, but it can be done by hand carefully.
Next, put the cover on top or slip into the plastic bag (horizontally). If you use a plastic bag you don’t need to seal it. Place the container on a window sill (south-facing will get the most sunlight).

Check on your container after the first few days. Depending on the temperature of your home, the amount of sunlight, and kind of seeds, you’ll see the first sprouts within about 3-7 days. This is also a good time to check the moisture and water the soil if necessary.
The sprouts can be cut with a pair of kitchen shears by taking a gentle hold of a section with one hand and snipping them close to the soil with the kitchen shears in the other hand. This way you can put small batches or handfuls in a bowl or other container without bringing all the dirt with you.
Rinse the microgreens or spouts before storing. Depending on the variety, they can keep up to 2 weeks in the fridge.
Now You’re Ready to Benefit From DIY Microgreens Nutrition
We can now safely say you can grow your own microgreens. It satisfies your body’s nutritional needs and your budget. Once you’ve grown your first batch, why not try an assortment to enrich your salads, sandwiches or anything else that could use an extra dose of healthy goodness?
You may even want to tackle herbs after this, or even container vegetables. If you stick with the level of complexity and tasks you’re willing to complete, your little plot of gardening goodness will bring positivity to your life, one seedling at a time.
This article has been read 4K+ times. Feelin’ the love!
You May Also Enjoy

Pesticides in produce is a common problem in the US, but stays off the radar when we make shopping decisions. Find out about the dirty dozen foods to avoid.
Read »
Don't Miss These


This Month's Letter
From the Editor
Monthly motivation and food for
thought from our founder.


Comments