
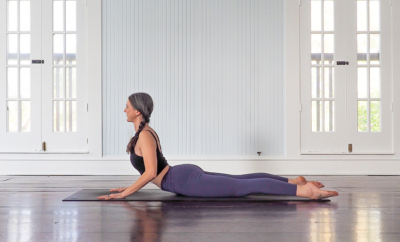
Wrist Injury? Here’s How to Modify 7 Common Yoga Poses (Photo Tutorial)
Do yoga with a wrist injury? It may sound impossible, but it is doable with the proper modifications. Injuries suck, but unfortunately, they’re part of life. They can come from anywhere, and seem to happen at the most inopportune times.
In this article, we’ll share a photo tutorial of how you can modify seven yoga poses with a wrist injury, so you can maintain your yoga practice. As with any injury, be sure to rest, be gentle on yourself and listen to your body.
Practice These Wrist Stretches and Exercises to Protect Your Wrists in Yoga
How to Practice Yoga With a Wrist Injury – Here’s How to Modify 7 Common Poses:
Sometimes we injure ourselves from overuse or strain of a joint. Other times, from something simple, like rolling over in bed or playing fetch with our dog. But being injured doesn’t mean you have to put your yoga practice on hold.
Yoga, particularly Vinyasa and Ashtanga styles, relies heavily on weight-bearing on the hands and wrists. From warm-up to backbending, we use our hands either to help with balance, or to carry some of our body weight.
If you have an injury, it can be difficult to figure out how to keep weight and strain out of your hands and wrists. But we’ve got yoga pose modifications to help you get on your mat and still enjoy practicing without risking further pain or injury.
Grab a chair and up to four yoga blocks, and learn how to modify these seven yoga poses to keep your hands and wrists happy.
Wrist Pain? Practice These 10 Stretches to Reduce Pain and Prevent Injury
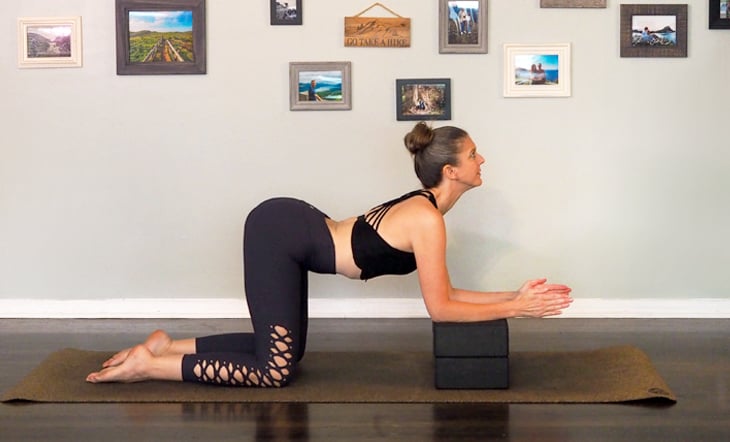
1. Cat and Cow (Marjaryasana and Bitilasana)


Cat and Cow are some of the ultimate feel good stretches for your spine. But with your hands carrying almost half of your body weight, it can be difficult to do with a hand or wrist injury.
Grab four yoga blocks to help you create this hands-free version.
Here’s How to Modify:
- Start in a simple Kneeling Pose (Vajrasana)
- Stack two sets of two blocks on their low height and place them on the ground
- Place your forearms on the blocks with your hands and wrists hanging off the front
- Shift your weight forward so your hips are stacked over your knees
- You can keep your toes curled under, or release your feet flat to the floor
- Check your spacing. You want your knees stacked under your hips, and your forearms under your shoulders
- Inhale and drop your chest and belly toward the ground, gaze up slightly, and lift your tailbone for Cow Pose
- Exhale and round your spine to the ceiling, gaze toward your belly, and tilt your tailbone toward the ground for Cat Pose
- Be careful not to scrunch your shoulders or neck when gazing up
- Articulate the movement through the whole spine, from your tailbone to the crown of your head
- Enjoy for at least five breath cycles
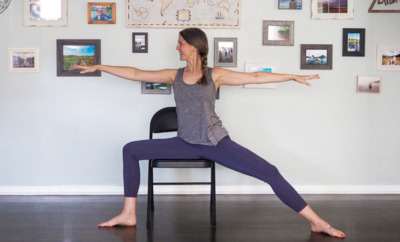
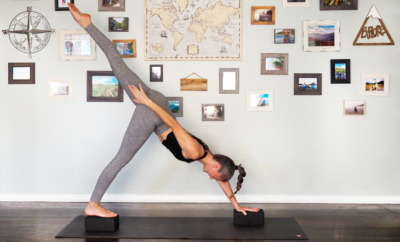
2. Triangle Pose (Trikonasana)

There are many options for hand placement in Triangle Pose, but most of them place at least some weight or strain on the hands or wrists. In this yoga with wrist injury modification, try using a chair and your forearm instead to make this pose hand friendly.
Here’s How to Modify:
- Start in Mountain Pose (Tadasana), standing in front of the left legs of your chair
- Take a big step to the side with your left foot
- Pivot your right foot to the right 90 degrees into external rotation
- Rotate your left foot to the right approximately 15 degrees to create internal rotation
- Lift your left hip slightly
- Lengthen through your spine and lean forward over your right leg
- Bring your right forearm to the chair seat for support
- Place blocks under your forearm to bring the seat height up as needed
- Rotate your left ribs up toward the ceiling
- Extend your left arm up, reaching toward the sky
- Gaze toward the ground to help with balance or up toward your left thumb
- Hold for five to eight breaths
- Repeat on the opposite side
Looking for more yoga tutorials and yoga tips? Check out our full library of Yoga articles here
3. Half Moon Pose (Ardha Chandrasana)

Half Moon is a challenging one handed, one leg balancing pose. Continue using your forearm on the chair for balance support so that you can continue practicing your yoga with a wrist injury.
Here’s How to Modify:
- Start in Triangle Pose as above with your forearm on the chair base
- Bend your right knee as you transfer your weight into your right leg
- Shift forward, bringing your right shoulder over your right elbow
- Lift you left leg until it is parallel to the ground
- Flex your left foot to help keep all the muscles in your leg engaged
- Once you find your balance, straighten your standing leg
- Rotate your pelvis open until your left hip point is stacked on top of your right hip point
- Extend your left arm up toward the sky
- Gaze toward the ground to help with balance or up toward your left thumb
- Hold for five to eight breaths
- Repeat on the opposite side
Want to try some other fun pose modifications? Use a Yoga Wheel to Turn Up the Heat In These 7 Poses (Photo Tutorial)
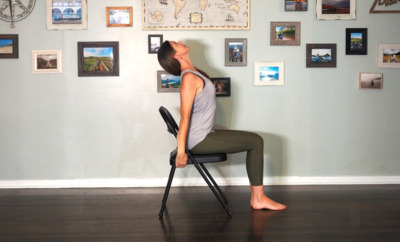
4. Pyramid Pose (Parsvottanasana)

This pose is traditionally done with a hand bind, or hands to blocks, both of which can put significant strain on the hands. Use your forearms on the chair to displace weight or strain on your hands and wrists.
Here’s How to Modify:
- Start in Mountain Pose, facing the seat of your chair
- Take a short step back with your left foot, landing with your foot at about a 45-degree angle
- Align both hip points so they are facing forward
- Inhale and lengthen your spine
- Exhale and hinge forward, bringing your forearms to the chair base
- Use blocks as needed to increase the height of the chair
- Shift your weight forward and back until the back of your hips are flat and parallel to the floor
- Keep your spine long for this variation (rather than rounding down over your leg)
- Gaze at the chair base or tip of your nose
- Hold for five to eight breaths
- Repeat on the opposite side
5. Revolved Triangle Pose (Parivrtta Trikonasana)

Ramp up your Pyramid Pose by adding a twist. Use your forearms and a chair as a yoga with wrist injury modification to protect your wrists and hands.
Here’s How to Modify:
- Start in Pyramid Pose as above
- Inhale and bring your right hand to your right hip
- Exhale and rotate your torso to the right by lifting your chest and right shoulder toward the sky
- Press your left forearm into the chair to help with balance
- Use your right hand on your hip to make sure your hips are still square
- If it’s comfortable on your shoulder, extend your right hand up toward the sky
- Gaze up toward the sky or your extended right thumb
- Hold for five to eight breaths
- Repeat on the opposite side
Do Your Wrists Hurt In Yoga? Here’s How to Modify 5 Common Yoga Poses for Wrist Pain
6. Standing Hand-to-Big Toe Pose (Utthita Hasta Padangusthasana)

In Standing Hand-to-Big Toe Pose, you press your lifted foot into your hand to lengthen the leg and help with balance. This pressure can irritate a hand or wrist injury.
This yoga with wrist injury variation keeps pressure completely off your hands and wrist, and adds some extra core and hip flexor work as well.
Here’s How to Modify:
- Start in Mountain Pose with your hands on your hips
- Shift your weight into your left foot and hover your right foot off the ground
- Once you have your balance, lift your right knee toward your chest
- Bring your right elbow to rest on top of your knee
- Blade your fingers and point them up to the sky
- If you leaned forward any while lifting your knee, realign your shoulders over your hips and feet
- Ground down into your standing left foot and lengthen through the crown of your head
- Point or floint (pointed foot with flexed toes) your right foot
- On your next exhale, open your right leg and arm to the right, keeping both hip points facing forward
- Simultaneously move your gaze to the left
- Leave your left hand on your hip, or extend your left arm to the side until it is parallel to the ground
- Hold for five breaths
- Bring your knee, elbow, and gaze back to the center
- Find a Mountain Pose before trying the other side
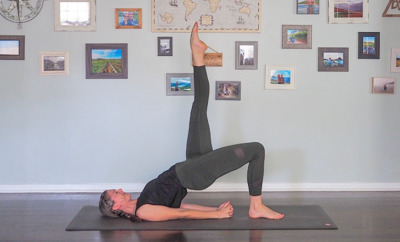
7. Bridge Pose (Setu Bandhasana)

Bridge Pose is frequently offered with hands pressing into the ground, or a bind behind the back. Both of these options place pressure on the hands. Try using your elbows instead in this modification.
Here’s How to Modify:
- Start laying on your back with your legs bent and your feet on the ground
- Separate your feet until they are hip-width apart with the pinkie toe side of your feet parallel to the edge of your mat
- Bring your arms down by your sides and blade your hands with your pinkies touching the mat
- Bend your elbows and lift your hands up toward the sky
- Use your core to lift your hips off the mat
- Create a slight internal rotation with your thighs to keep your hips, knees, and feet aligned
- Avoid crunching in your neck or shoulders by lifting through your chest
- Gaze straight ahead
- Hold for up to five breaths, before carefully lowering your bum back to the mat
Wrist Pain In Yoga? Try This Sun Salutation Variation (Photo Tutorial)
Yoga With a Wrist Injury Is Possible!
Practicing yoga when you have an injury is all about listening and responding to your body. If something hurts, then skip it or modify it with a pose or variation that fits your current abilities.
The versatility of yoga is one of the things that makes it so great. There is a practice, style, or modification to suit every body, every situation, and every day. Don’t let hand or wrist pain keep you from the practice you love!
Find Full Body Healing with this Online Yoga Class
In today’s technological age, most of us spend a lot of time typing, texting and sitting. These repetitive motions lead to bad posture, chronic pain, and even decreased energy levels. This online yoga class from YA Classes is designed to help reverse the negative effects of our sedentary lifestyle. Practice yoga poses, stretches and movements that will help decrease pain, prevent injury, and increase mobility.
Get ready to feel good! Not yet a member of YA Classes? Try it out for free for 14 days.
This article has been read 3K+ times. Feelin’ the love!
Don't Miss These


This Month's Letter
From the Editor
Monthly motivation and food for
thought from our founder.


Comments