
Benefits of Using Foam Rollers + Tips to Get You Started (Video Tutorial)

Foam rolling is an extremely beneficial way to help the body recover after physical activity, and stay healthy overall. Foam rollers target not only our muscles, but also our deep connective tissues like our tendons, ligaments and fascia to help ease pain and restore a healthy, full range of motion.
Why you should use a foam roller
Fascia is woven connective tissue that covers and connects every muscle, nerve and bone in our body. Because the entire body is connected by this tissue, chances are if you experience tightness in a certain area of the body, it could be the result of tightness in another area.
For example, if you feel pain in your lower back, it could be due to tight hamstrings. If we do not work to release these connective tissues, they can begin to tighten and even bind together, eventually causing pain in the body.
If a massage or deep tissue work is not available, foam rollers are a great alternative. But along with massaging the tissues, there are many more benefits to using foam rollers.
Benefits of using foam rollers:
- Reduce scar tissue
- Increase circulation
- Help the body recover faster
- Improve flexibility and mobility
- Reduce inflammation
- Myofascial release
- Reduce joint stress
Want to learn how to use a foam roller? Watch the video below, and read the accompanying tutorial for further guidance:

Here are 5 beneficial ways to use a foam roller:
1. Shoulders
- Place the foam roller vertically on your mat with the base near your hips
- Recline the entire spine onto the foam roller
- Extend arms skyward and contract shoulder blades over the roller
- Next, cactus the arms and squeeze shoulder blades into roller
- Extend arms skyward and slowly lower toward the mat, pausing when you feel any tension
2. T-Spine Extension
- Place the foam roller horizontally at the base of your rib cage
- Give yourself a tight hug and slowly recline onto the foam roller
- Keep hugging yourself as you work through any tight areas you may encounter
- Continue moving the foam roller up the spine toward the base of the neck, and gently roll side to side to release any areas of tension
3. Side Body Work
- Begin on your right side with the foam roller on your right lat, just below your shoulder
- Slowly roll side to side until you find a tight spot
- Spend time opening the tissue by contracting and releasing the area of tightness
- Next, roll the foam roller between your hip point and the bottom of your rib cage
- Gently roll until you find a tight area in your obliques
- You may find more tight areas if you roll slightly onto your low back and glute
- Continue to slowly work through as many tight areas as you find them
- Then switch to the left side
4. Hips/Glutes
- Sit on top of your foam roller and place your right leg over your left so your right hip lifts off the roller
- The weight will shift into the left side as you begin to work into the left hip and glutes
- When you’re complete, switch to the right hip by draping your left leg over your right
5. Hamstrings
- Begin seated with your legs extended and the foam roller under your thighs
- Lift your hips off of the mat and bend your left knee, placing the left foot on the floor to focus on the right hamstring
- Slowly roll side to side, massaging the tissues
- When you work through one area, roll down the foam roller until you reach a new area of tension or tightness
- If you would like to add intensity, drape your left leg over your right
- Switch to the left hamstring and repeat
6. Calves
- Remain seated with your legs extended and move the foam roller down toward your calves
- Lift the hips and plant your left foot on the mat
- Gently roll side to side on your right calf to massage the tissues
- Option to drape the left leg over the right for added intensity
- Repeat on the left calf
7. Quadriceps
- Lay on your right side with your hand or forearm supporting you
- Place the foam roller under your right thigh
- Gently shift your stomach over the mat so your right quadricep comes onto the roller
- Place both palms or forearms on the mat to support the upper body
- Slowly roll side to side across the quadricep to find areas of tension and mindfully work through them
- Repeat on the left side
8. Adductors
- Begin on your stomach with your right knee bent toward the right side of your mat
- Place the foam roller under your right thigh and begin to roll toward the midline
- Gently press the right knee toward the earth to add intensity
- Keep rolling closer to the adductor
- Repeat on the left side
9. Foot Roll
- Use the wall for balance and step one or both feet onto the foam roller
- Work one foot at a time
- Step down firmly into the foam roller with the arch of your foot over the roller
- Slowly move back and forth over the foam roller, applying continuous pressure to both sides of the foot
- Switch feet
10. How to use your foam rollers as yoga props
Low Lunge
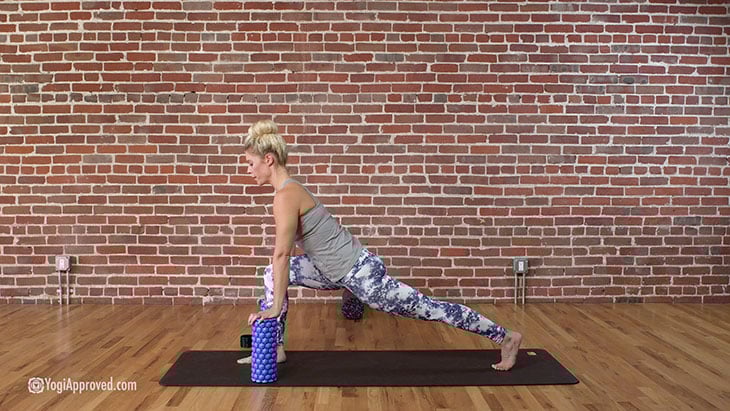
- Place two foam rollers (the same height) at the top of your mat
- From Low Lunge, place both hands on the foam rollers to help with balance, strength building and flexibility
Triangle Pose

- With the right foot forward, place a foam roller inside or outside the front foot
- Place your right hand on the foam roller to help lengthen your spine and open your hips
- Repeat on left side
Revolved Triangle Pose

- From Triangle Pose, place a foam roller on the inside of the right foot
- Place your left hand on the foam roller to help lengthen your spine
- Exhale and twist the right arm up, keeping your left hand on the foam roller
- Repeat on left side
Half Moon Pose
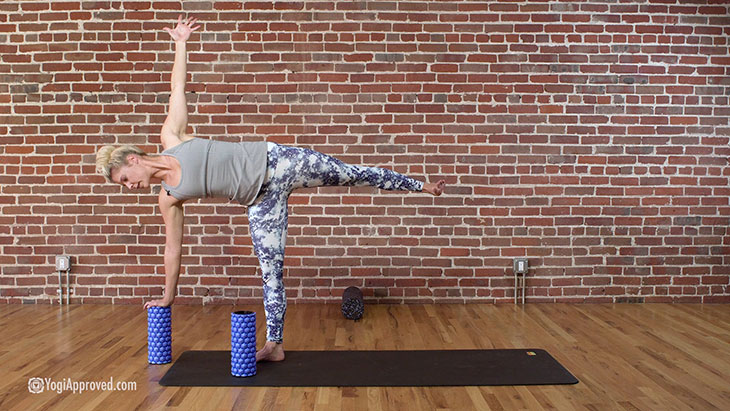
- Bring your right foot forward and find Triangle Pose with your right hand on the foam roller
- Shift your gaze to the top of the mat and place the foam roller about ten inches in front of you
- Engaging the body, slowly make your way to Half Moon
- The added height from the foam roller helps you stay balanced and open the hips
- Repeat on left side
Bridge Pose
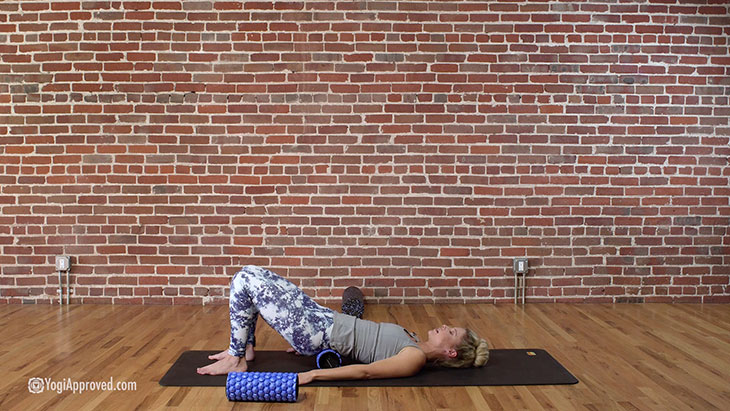
- Recline onto your back with your knees bent and feet on the mat
- Lift your hips and slide the foam roller under your low back
- Exhale and allow the low back to release and find a gentle massage from the foam roller
Savasana

- Place a foam roller on its side under both knees
- Option to use a second foam roller as a pillow for your neck
- The added support allows the muscles to release and can give a gentle massage
Who can benefit from foam rollers?
Many athletes, weight lifters, CrossFitters, yogis and gym lovers find foam rolling to help with mobility and recovery. But you do not have to be a serious athlete – anyone can benefit from using foam rollers.
Why are there different types of foam rollers?
Foam rollers differ in length, width and surface texture to be used for different body work. You can choose from a smooth, high density foam roller (we recommend the High Density Speckled Foam Roller from ProSource) to work the tissues, or a textured foam roller (we recommend ProSource’s 2-in-1 Hexa Massage Roller for more intense body work.
Tips when using a foam roller
It is important to use a foam roller with intention. Moving slowly and mindfully will give you much better results with deep tissue work. It is not just about rolling back and forth while you chat with a friend – it is another opportunity to connect to your body and listen to what areas need attention.
For most of us, foam rolling can be painful. This is when we know we are targeting an area that needs work. Much like a yoga practice, it is important to take your time, breathe, and remain relaxed while you are using a foam roller.
Adding foam rollers to your yoga practice or daily exercise/wellness routine can have amazing benefits for your body that you will notice immediately. Always make time to give yourself and your body the proper self-care it needs, and having a foam roller or two around the house is a great place to start.
High Density Roller

ProSource Speckled Foam Roller ($19)
Keep your body in peak condition with the ProSource High Density Speckled Foam Rollers.
Purchase this roller
HEXA Massage Roller

ProSource 2-in-1 HEXA Massage Roller ($39)
Two-in-One feature – twist apart to use separately as two 12” pieces, or combine for a full 24” inch roller.
Purchase this roller
Have you been curious about foam rollers? Have you used them before and felt the benefits? We would love to hear from you, leave us any advice or feedback in the comments below.
This article has been read 7K+ times. Feelin’ the love!

Don't Miss These


This Month's Letter
From the Editor
Monthly motivation and food for
thought from our founder.


Comments